Realistic break-apart effect in Photoshop

There are a lot of tutorials on the web about break-apart effect. But for sure your not that old because anyone who stop’s learning is old, whether at twenty or eighty.

.net Naming Conventions (Part 2)

.net Naming conventions covers a great topic when naming windows controls. It will give you a wide range of ideas and options to promote readability and integrity for your next project.

To Build a Bridge

This story is one of the best I have ever read. Imagine a man who can only move one of his fingers yet he was still able to pursue and achieve his dream. Inspiring isn't it?

05 June 2011

Realistic break-apart effect in Photoshop

In this tutorial I will show you how to make a break-apart effect on an image. We will be using several techniques like layer blending, masking, using pen tool and also adjustments layers. We will also make retouches on the subject image to give it more details.

There are a lot of tutorials on the web about break-apart effect. But for sure your not that old because anyone who stop’s learning is old, whether at twenty or eighty. So it would not really cost you much to learn more and review some of the basic yet great techniques in Photoshop. I will be giving details on each step so that you can experiment on it and get your desired effect especially if you’re using another image for this tutorial.


Here is a preview of my original image:


To start this tutorial you need to download and extract the files to your computer.
Download Me

Step 1
Open the extracted image into your Photoshop. Double click on its layer and press enter to make it a normal layer. Create a new layer below it and name it background then fill it with color white. The layer will serve as your background.

You will have something like this on your layers palette:


Step 2
Grab the pen tool. Make sure the path is active.


Make a working path around the image.


Right click inside the working path and choose “make selection”.


Keep the feather radius to 0 and check anti-aliased.


It will look the same as below:


Step 3
Press ctrl + C to copy the selected path.
Create a new layer and name it model.
Press ctrl + P to paste the selection. Then erase the parts between the arms of the subject.
Make two copy of the model layer.
Name the first duplicate “Model Linear Burn”
then “Model Screen" for the second layer.
Your layers palette would now look like this:


Step 4
Hide the original and model screen layer by clicking the eye icon located at the left side of each layer.
Activate/choose the “Model Linear Burn” layer.


Change its blending mode to linear burn.
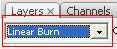


The image will look a little more detailed but there are parts that are very dark.
Let’s add a layer mask to remove those parts.
Pick a soft brush and set black as your foreground color.
Simply paint on the parts inside the red line as shown below.


Now unhide the Model Screen. Change its blending mode to screen.
You will notice that the image look so bright.
But we only need the bright side to where we want the break effect to happen.
Add a layer mask to this layer to remove the unwanted parts.
Use a soft brush then paint black inside the red line as shown below.


Step 5
Add a new adjustment layer.
Layer > New adjustment layer > Black and White.
Then adjust the values based on the settings below.


I want to preserve the color of the lips of the subject.
We just have to click on the layer mask of the adjustment layer.
Then pick a small soft brush with black foreground and paint on the lips to reveal its color.


Add another adjustment layer.
This time choose curves then adjust the curves same as the settings below.


Preview of the effect so far:


Step 6
Now let’s move to the break-apart portion of the tutorial! Load the “Debrish Brushes” that you have extracted from the source file into Photoshop.

Create a new layer called “break apart” on top of all other layers:


Grab one of the brush in the “Debris Brush” set, use a color match the background color (in this case it’s white), then use the lasso tool with 100px feather to draw a selection in the area you would like to break apart, simply paint over it. As you paint over the image you will notice that some parts of the body are slowly disappearing. Continue painting until you get your desired effect.
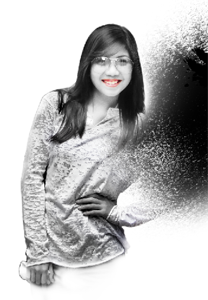


Now to create the break apart particles
create a copy of the break apart layer.
Then press Ctrl + I to invert the colors of the layer.



Now to lessen the density and to make it look like break particles.
Add a layer mask. Grab one of the debris brushed, set the foreground color to black. Paint until you get your desire effect or something that looks like this.
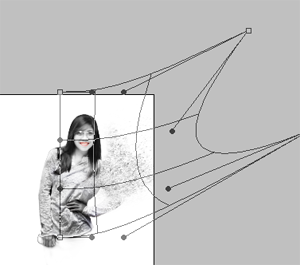


To make an effect that it’s blown up
away from the body.
Press ctrl + T to transform the image,
then right click and choose warp.
Then adjust to handles to make a motion.


If you want to create the same effect on another part of the body just repeat the procedure from step 6.

To add colors to your effect just create a new layer on top of other layers.
Set its blending mode to overlay or soft light. Pick a large soft brush then start painting.

You can also try and experiment with the other filters for your image or add additional adjustment layer to enhance the output. Add more text to make it more descriptive.

Here is the preview of my final output. I made several adjustments and added filters to enhance the colors. I also added another break-apart effect on the left side of my image and text for signatures..

Watch out for the next Photoshop article
on creating stylish cloud watercolor
background effect.


I hope you enjoy the whole tutorial! Feel free to leave a comment if you have questions.

01 June 2011

.net Naming Conventions (Part 1)

What is .net Programming Standard for Naming Convention?
There are a number of Naming Convention that programmers used this days and this has always been a controversial topic if which one of this Naming Convention is the standard one. There have been a lot of arguments regarding the use of Hungarian Notation of Naming Convention and the combination of Pascal Casing and Camel Casing as the Programming Standard for Naming Convention (Too bad I can't enumerate them all here!). To cut down all the ideas, it's really up to the preferences of the team who will be building the program which Naming Convention they will be using to promote readability and integrity of their codes

All the Programming Naming Conventions that you will see here are all my personal preferences. I will only include those types that I used the most so that I can provide enough reasons why I preferred this conventions. I'm just a class newbie so don't expect much of a techie explanation from me.


Classes
I put the prefix "cls" after a noun when naming my classes. This can help me identify the classes from the other items in my solution. It also helps a lot in intellisense grouping. You only have to type "cls" then after that you will have the list of all the classes that you made in your solution. Try to avoid abbreviations, and try to always use nouns. Always use a capital letter on the first letter of each words. If you want to create a class calculator then use "clsCalculator" and not "clsMyCalculator". When you want to add an adjective to the name of your class, I prefer putting the adjective between the prefix and then the noun. Use "clsScientificCalculator".

Public Class clsCalculator
Public Class clsSettings
Public Class clsAdminSettings

Subs and Functions
I prefer Pascal Casing for my subs and functions. No underscores except for the event handlers. Avoid abbreviation and stop being too lazy. Try to promote readability on your codes. Be descriptive on the names of your subs and functions and use verbs to describe what it will do.

Sub DoSomething()
Sub CalculateAverage()

Class-level Private and Protected variables
For this variables I just put an underscore before it's name in Camel Case. I find this very useful because of it's uniqueness and you can easily individualize those private variables from the other variables in your class.

Private _studentID As Integer
Private _productCode As String

Properties and Public Member Variables
Pascal Case, No underscores and abbreviations. This convention is consistent with the .NET Framework and is easy to read.

Public Property Gender As Boolean
Public Property Age As Date

Parameters
Parameter can either be an input type or an output type. For input type I put the prefix "pi" which stands for parameter input and use the prefix "po" which stands for parameter output. Most programmer use Camel Case for naming their parameters. But I put prefixes on my parameter's to know that it is a parameter type variable and also to avoid the possible misapply of the said variable.

Byval piLastname As String
Byref poAverage As Double

Procedure-level variables
Camel Case. It's easy to read and this variable does not really need that much particularity since it will only be used inside it's procedure.

Dim ageLimit As Integer
Dim contractSalary As Double

As you can see I don't really follow just one single Naming Convention. I used different conventions on different types depending on the situation so that my codes will be as readable and integrated as possible. On my next blog I will be sharing with you the naming conventions that I used for my controls and other items that you can add in your windows solution explorer.

Share

Twitter Delicious Facebook Digg Stumbleupon Favorites More